Showing posts with label clay. Show all posts

Wednesday, May 08, 2013

Photos, Show, and Packing


Today I am trying to catch up on photographing all my pots from the last two soda firings.  I am feeling waaaay behind and just a wee little bit stressed.  I need to add these pics to my website, make a power point presentation for Penland
, where I am going in a little less than two weeks.  I need to pack for the trip.  I also need to start packing for my big cross country trek to grad school.  Plus, this weekend I will be showing and selling my work at ChiVAA's Art Fiesta.  Thank goodness I have friends and family to help me out with display equipment and set up!


I love the way the pots have turned out in the last couple of firings.  I have learned tons in the last year of my soda experimentations.  I finally reduced my soda amount by half and really pumped up the reduction and I think I am starting to get the feel of how this works.  I am loving the forms of these bottles and I think I will work on some more of them when I am in North Carolina. Bye for now. Gotta try to get on top of stuff.


Come on down and see me this weekend!

Tuesday, April 30, 2013

Clay Rocks!

So much clay, so little time to blog about it!  Here is a little recap of last weekend's Chico State exhibit at CCACA clay conference in Davis, CA.


Rick Barnett

Kara

Chaz Jay

Chaz Jay Detail

Toni

Amanda Swede Detail

Mallory Russell

I'll update with proper names and titles after I come back from the university tomorrow.

Friday, March 08, 2013

Soda Fired Pitchers and Mugs


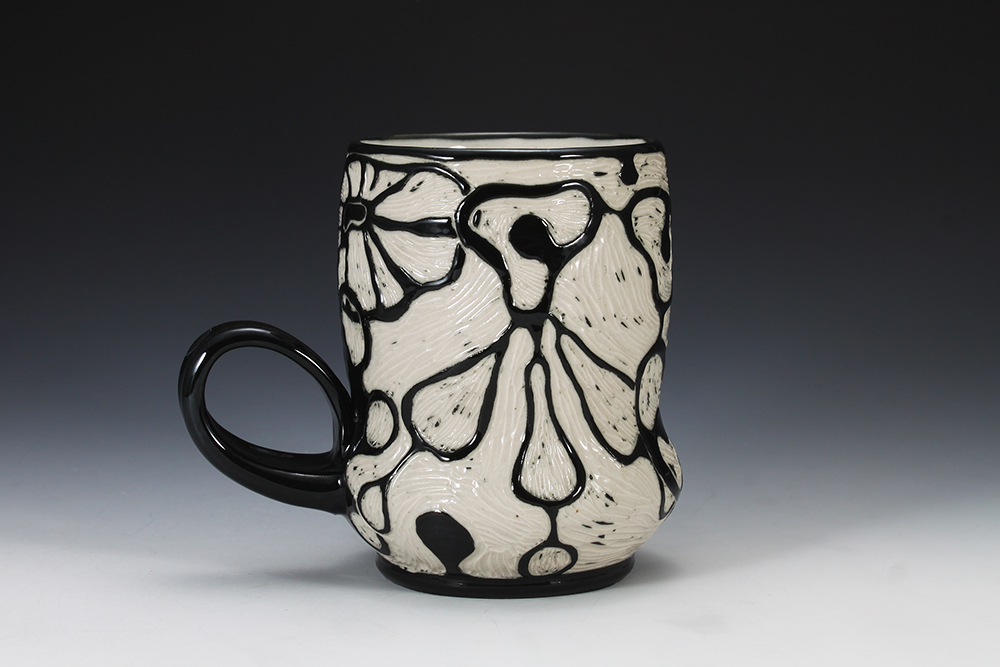
Here are the results from my soda firing last week.  I've been having fun pairing them up and seeing how nice they look in good light and on the nice backdrop.  I think I am going to be ordering some business cards soon so these photos will be great for that. I love to order my business cards from Moo.  They are my favorite! I still have a lot more pictures to take before I'm done so that's what I will be doing this weekend when I am not lounging in the sun.  I am so excited for daylight savings.  Yippie!  Next week we should be putting in another soda firing.  Have a delightful weekend.


Tuesday, March 05, 2013

Comfort Food


So, I am feeling pretty bleh today.  We have had unseasonably gorgeous weather here in Northern Ca. Last week it got up to about 77 degrees F.  Phew, in February, no less.  It has been truly wonderful.  Now there is a storm blowing in and who knows?  Maybe it just has me in a mood.  On the up side.  A friend of mine has ducks that have been giving him more eggs than he knows what to do with.  Who knew ducks keep producing eggs durring the winter?  So, I cheerfully agreed to take some off his hands. Now, people who know me will have their eyebrows lifted in a question mark.  Because when I think of eggs, I usually think, EEEWWW YUK.  Yea, I am not a big fan of eggs.  Unless, that is if I am baking with them.  I will eat them, though for protein when I am tired of tofu.  But it has to be like, a little egg with those veggies, please.  Like that veggie scramble up there in my delightful little Erin Paradis bowl that I got at Crimson Laurel Gallery in Bakersville, NC last spring.  Can you see any egg in there.  I didn't think so.  One egg and a whole lot of veggies, spices, salsa, and olives just to make sure.


Now, eggs are eggs are eggs.  But try as I might tell myself that they were just bigger, fresher, better versions of chicken eggs I was a little squeamish about using them.  So I figured it would be best to try them out in brownies first.  Yup.  I killed two birds with one stone.  Comfort food and new territory, albeit, a teeny tiny challenge.  Now they were scrumptious, but I don't think nearly as beautiful as this Sharon Virtue tile I picked up last summer at the ACGA show in Palo Alto, CA.

And...don't you think these images are fun?   I got a hand me down iPhone 4 so I could finally play with iPhone photo artistry.  Alright then, I am going to pull up my big girl panties and get out of the house!

Friday, February 08, 2013

A Speck of Sun


After yesterday's post I headed over to my friends studio to hang out with the Claymates and work on some of these fun mini vases.  It was mostly an ugly day yesterday but the sun came out just long enough for me to run these outside for a pic.  After I got home the deluge started up again.  I'm not sure why but the rain really bugged me yesterday.  It made me sort of anxious and then I realized the water was dripping loudly on a bucket outside so I moved that and it was a little better.  I also looked up the weather report for Massachusetts and Rhode Island where they are predicting a historical blizzard.  Suddenly, I didn't feel quite as bad.  I finished off the evening by cleaning up my studio so I can have a fresh start on some more work.  Now if I can just keep up the momentum I will have enough new work that I wont keep missing out on calls for artists.  Have a great weekend!

Monday, January 14, 2013

Soda Love


Remember a couple of posts ago when I was working on my paper stencil patterns at my computer table?  Well, here are the beauties!  Yes, it has taken me almost a month to get them photographed.  The firing was right before Christmas!  I think I have an aversion to my somewhat bulky photo shoot set up.   
Time to tackle that problem and make a mini version that doesn't take over my tiny living room.


But all that aside, I am really excited with the progress I am making with these.  It was a crazy long firing because the kiln door bricks and furniture got wet in a wild downpour so we had to "dry" out the kiln first.  It went for sixteen or eighteen hours or so when it should have only been about 12.  We did finally get the kiln firing much more evenly but I messed with the flew damper enough to knock a bunch of junk down into some of my pieces.  I've ground out a bunch of it and will try touching up the glaze and re-firing them in another cone 10 firing, or even cone 6 electric to see how that might work.


I'm busy making more work so that hopefully I can get another soda firing going by the first of February. Keeping my fingers crossed about that one.  I'm not exactly sure if I'll have access to the same kiln but if that doesn't work out I can always take some work out to Penland!  Yep, I'm headed out there again in May for a month to do some more studio assisting.  I can't wait!  And I am also going out to Arrowmont for my very first time!

Side A
Here is another one of my favorite pieces that I made last fall.  I stuck this in with my besties and started using it right away.  Somehow I just forgot that I wanted to document it.

Side B
I actually made two of these and the other one was fabulous also, that is until I sacrificed it to the soda kiln.  I was so positive it would come out great but I was not at all happy with it.  The underglaze fumed and bled and the clay body went very grey.  It's interesting and I'm sure someone would like it but me?  Not so much.  I'm glad I took this photo.  Something about seeing them in the right light on a nice backdrop has freshened my determination to make a few more.  


Tuesday, December 18, 2012

Drink This!


Life is moving on a pretty rapid clip as my semester as teaching assistant at Chico State is coming to a close.  I am so excited that I have been accepted to two great shows coming up very soon.  Here is the poster for the first show, Drink This! The Workhouse International Ceramic Cup Show, juried by Linda Arbuckle.  Linda is a wonderful ceramic artist who shares so much information with the ceramics community.  I am truly honored to have been accepted into this show.  Thanks Linda and Workhouse! 

Monday, October 01, 2012

Paper Clay Adventures


Right now I feel like I am participating in a mini, self-imposed, paper clay residency.  I got really fascinated by this when Rebecca Hutchinson taught at CSU Summer Arts in July.  Rebecca encouraged me to try this technique of stenciling, painting, and silk screening on a slab of plaster and then pouring a layer of paper clay slip on top.  I was so wrapped up in my installation project that I never got around to trying this out.  So now I am making up and giving it a whirl.


I want to expose a screen next but first I thought I would start off with a hand cut stencil.  I actually forgot about drawing directly on the plaster so I probably would have started with that.  Here I am using a thick porcelain slip made from my throwing leftovers to which I have added toilet paper.  I took a small amount of it and tinted it with turquoise stain.  


I had to let go of my ocd, perfectionistic tendencies with this whole process.  The stencil is not precise and the slip kind of likes to spread under the stencil a bit.


The crazy part is when you pick up the bucket of paper clay slip and pour a thick layer over the whole slab, obscuring the image in the process.  By the way, don't stop pouring and run to get your camera as the leading edge of the slip will start to dry out and will leave a line of demarcation after you pour the rest of the slip.  This line will have a tendency to want to crack later when you are manipulating the slab.  Good to know, just pour it all at once and spread it quickly and thick.


After a few hours, depending on weather (it was a hundred degrees when I did this), a half inch thick pour of slip will have turned into a quarter inch thick sheet that can be peeled pack from the plaster.  I was so excited to see that it actually worked and didn't tear.


I had some extra so I used a commercial stencil on this smaller plaster slab.


This close up shows the paper fibers pretty well.


So, I learned that it is good to plan what you are going to do with your sheet of clay before you make it so you aren't running around scratching your head while your sheet starts to dry.  I am not so sure that utilitarian pieces are the best use of this process but I didn't have a sculptural project in mind.  I also learned that paper clay cuts a whole lot easier with scissors than with a blade or wire.  


I love this "rolled" foot.  I enjoyed experimenting with this because it forced me to let go.  I also like that their where certain things the porcelain slab would and wouldn't do.  Because of this,  the evidence of the process is necessarily revealed such as the cracking of the surface of the clay as it was formed.  Hmm, I'm kind of liking this.  It will be interesting to see where it leads me.  

If you want to know more about working with paper clay, an excellant resource is Rosette Gault's book on the subject.


Wednesday, September 26, 2012

Sunshine Cobb Visits CSU Chico


I have been a teaching assistant this semester at CSU Chico and one of the added benefits is getting to know about the visiting artists!  On Monday and Tuesday we were honored to have the talents of Sunshine Cobb as she gave a ton of amazing demos.  I first learned of Sunshine about a year ago and have been a big fan since.  In May she was featured on the cover of Ceramics Monthly so we felt pretty special having her visit.  She squeezed us in between having just returned from presenting at Utilitarian Clay VI at Arrowmont  in Tennessee and just before leaving for her residency at the Archie Bray Foundation in Montana.  Phew!  Great job, Sunshine.  Thank you so much!  It was wonderful meeting you.


Lidded Boxes in progress.


Showing us how she uses a cheese cutter to trim the tops of her boxes.


My sweet score is this delightful garlic storage vessel which now sits on the shelf in my kitchen.

Tuesday, September 11, 2012

Paperclay Vessel


All the beautiful flowers blooming and the early morning coolness on my front porch enticed me to stay home and experiment with some paperclay ideas.  In July I was able to work with ceramic installation artist, and professor at the University of Massachusetts at Dartmouth, Rebecca Hutchinson.  She was our last visiting artist in Clay as a Medium for Sculpture at CSU Summer Arts in Monterey, CA.  She taught us an amazing array of techniques for "breaking the rules" when working with clay. She taught us about the different kind of cellulose fibers to use and what kind of stuff to dip into paper clay slip.  She also showed us how to make durable, non-fired pieces and how to incorporate silkscreen and stencil use with colored slips for surface decoration.  It was a ton to cover in just three days.  If you ever get and opportunity to go to one of her workshops I would highly recommend it!


I thought I would start out simple with these little clay medallions I made by dropping dollops of paperclay onto a plaster slab to stiffen up.  Need more plaster slabs!  And minions to make these little cookies while I construct the forms.


The construction process was oh so delightful! I started the base out on an upturned bowl covered with paper.  I left it out in the sun to stiffen up and then took it off the mold, turned it over and started adding my cookie "shingles."  This stuff is amazing.  I love that you can add wet pieces to bone dry work.  It is also really easy to rehydrate areas with a spritz of water as the paper keeps the clay from weakening.


Day two.  You can see where the bottom section has dried and I continued shingling on the fairly dry rim.


I really wanted to continue and make the form even larger if it wasn't for a few crucial factors.  One, I ran out of slip!  Two, I needed to make the base thicker and better able to take the weight of the piece and not be topsy.  Since I started out with all these cookies of pretty uniform thickness there just isn't enough weight at the bottom.  I think the next one will have a thicker pinch or coil base to start working on. The last issue is transportation.  Oh yeah, when one does not have a kiln...  You get the idea.


I love how the interior looks like scales.  I might flip the cookies around on the next piece so the flat, scale-like surface is on the outside.  Now to figure out how I want to finish and fire this piece.  I am thinking of the soda kiln but not sure if it will fit.  I might need to make some smaller ones for that little kiln for sure.


Sunday, September 09, 2012

Recent Soda Firing


Opening up last week's kiln load. Or was it longer ago than that?  I'm not sure where the time keeps slipping away from me!  Anywho, check out those cones on the bottom.  Cone 12 maybe?  All I know is my tumblers were on the bottom and I had a lot of bloating.  Maybe B-mix at this temp is not so good.  Or maybe we just need to figure out how to get the kiln firing a wee bit more even.  I know!  I'll just put my stuff on the top next time.  What a concept.  I know, sometimes I'm a tad slow.


Here are the four tumblers that came out good.  One still is pretty bloated but I turned it around for the shot.  I actually had eight tumblers but four of them cracked.  Pretty weird cracks too.  I'll have to get some pics of those too show y'all.  Could use some postulating on causes.  I have a theory but we'll see.  
I've got some bowls just like these tumblers going into the kiln next week plus I think I'll put in a couple of porcelain pieces and see how they do.  B-mix on the top, not sure where to place the porcelain but I think it would withstand the bottom.  Hey, I could put a porcelain one on the top, one in the middle and one on the bottom.  I astound even myself sometimes.  Just kidding!  Oh, and as for surface technique, that is paper stencil with a baur flashing slip brushed on.  I also used the little sewing wheel thingy texture maker and then bisqued.  Then a black slip was rubbed into the texture.  I glazed the inside with celadon but it doesn't look as good as I'd like.  Maybe not enough reduction on the bottom.


The recycle clay is liking the soda.  And check out that design and texture!  Wish I could claim those as mine.  I am thinking of stealing, ahem, borrowing, the technique.


Happy mugsy.  My tumbler in the back, otherwise known as a giant test tile.